Pages

Showing posts with label lock-down - Tech 2021. Show all posts

Friday, 19 November 2021

Hard Materials/Tech - Mask making

 Yesterday in Tech we learnt how to make masks out of CVA foam. These are he instructions and my demo masks. I decided to make a horse/unicorn mask.


Instructions/Steps:
1. Figure out the pattern you want to draw
2. Get a piece of PAPER and put it on your face
3. Feel around and put 2 dots where your eye holes are with a pen
4. Fold paper in half
5. draw your pattern on ONE side
6. Then cut it out while still folded
7. After this make eye holes where your dots were and cut them out
8. Now transfer it to the CVA Foam, but put it in the corner instead of the middle to save space
9. Now once cut out + eye holes heat the mask up on stove or with heat gun
10. Then put the mask onto your face (making sure it's not too hot) and mould it into your face.
11. Now put a strap on it and your ready to wear!


Thursday, 4 November 2021

The Future of: Toaster! - Hard Materials Class

The Future of Toaster!

Questions:

How is this going to change in the future?

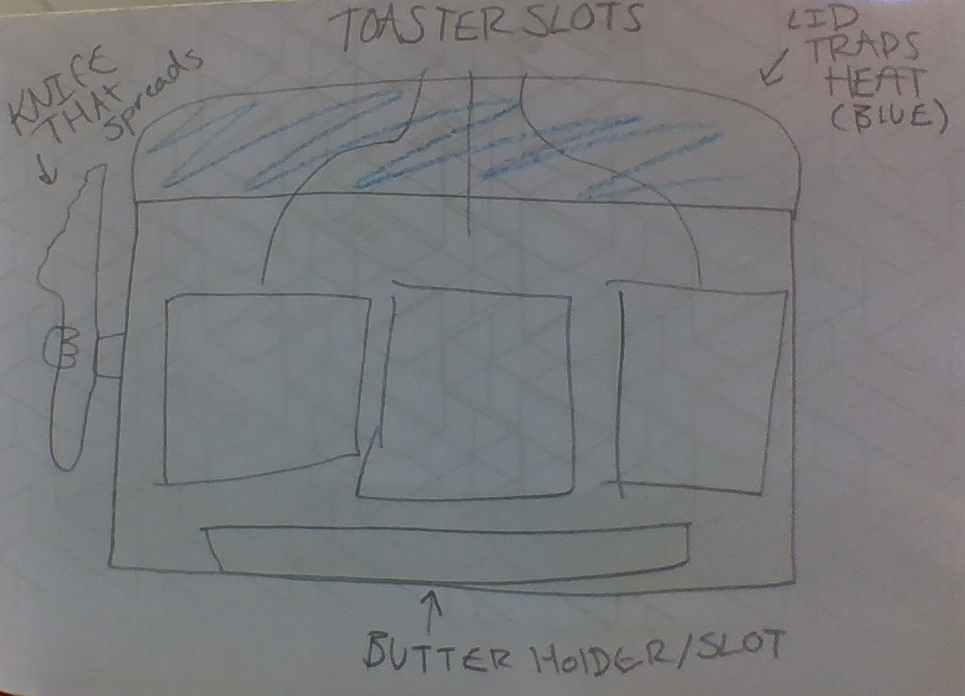
People are making the toaster more eco-friendly. Adding/Switching plastic for bamboo, and metal for thick glass. When you put the bread in the slots, a lid closes trapping the heat inside.  

What would I add?

3 toaster slots, (2 is not enough, 4 is too much).

Flat toaster.

Lid that traps heat.

When it comes out the butter is already spread on.

It has a knife attached and spreads like a robot. 

SKETCH


Thursday, 21 October 2021

Different types of Wood Joints - Tech: Hard Materials


Wood Joints


The simplest and easiest joint to make is a Butt joint where two pieces 

of wood are just glued or nailed together.

It is not very strong and and can be pulled apart without too much effort. 
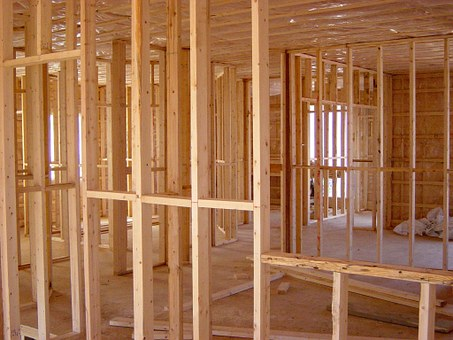
 It is commonly used in house framing.


Here are some useful ways of joining wooden pieces together that are used In woodwork and carpentry.


1. Housing joint.


a) Find a clear picture of this joint and insert it here.
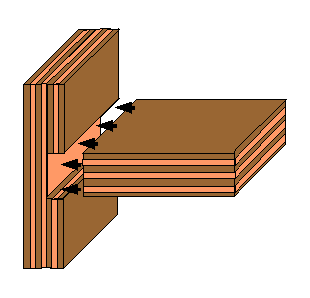


b) What are housing joints most commonly used for?

       Used for fixing shelves or book shelves

c) Are there different kinds of housing joints?   Can you include pictures of them? No

       Tapered Housing Joint

d) Can you find a housing joint anywhere in your house?

       Yes 


2. Mitre joint.


a) Find a clear picture of this joint and insert it here.


b) What are mitre joints most commonly used for?

       Furniture such as boxes, draws, dressers etc.

c) Mitre joints are not very strong, how can they be made stronger?

       You could make it stronger by layering wood and using more screws. 

d) Can you find a mitre joint anywhere in your house?

       Yes


3. Finger joint.  (Also commonly called a Box Joint)


a) Find a clear picture of this joint and insert it here.


b) What are finger joints most commonly used for?

       Floor boards or doors

c) What makes the finger joint so strong?

        When the two pieces meet they interlock making it very stable and secure.

d) Can you find a finger joint anywhere in your house?

       No


4. Halving joint.


a) Find a clear picture of this joint and insert it here.


b) What are halving joints most commonly used for?

       Strengthening the rails of tables and chairs 

c) What makes the halving joint so strong?

         They are interconnected and it is pressing down instead of on the side or upwards

d) Can you find a halving joint anywhere in your house?

      No 


5. Mortise and Tenon joint.


a) Find a clear picture of this joint and insert it here.
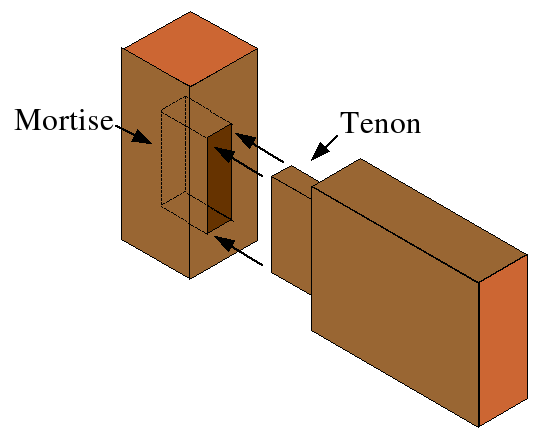


b) What are Mortise and Tenon joints most commonly used for?

       Frame construction eg. Tables and chairs

c) What makes the Mortise and Tenon joint so strong?

       Its tight fitting design.

d) Can you find a Mortise and Tenon joint anywhere in your house?

       No


Thursday, 30 September 2021

Tool Safety - Hard Materials @Tech

(Remember, when researching online, we are considering “wood hand tools”.)


1. Consider the hand tools that you may use in the woodwork shop.

*Mallet - Chisel

2. Consider how they are used accurately and safely.

*Hands behind the sharp end of the chisel and hold it in a fist. Keep fingers away from the mallet and hold it with a tight grip.

3. How should they be stored to be sure that they are in good condition?

* neatly piled in a draw not thrown on top of each other so they don’t go blunt. 

4. Think about the way we should behave in a busy workshop to keep safe.

*Stay in our space and leave our tools on the table unless you are working with them. Don’t carry them around to another person's space.

5. Can you imagine a situation that could result in an accident?

*Holding your tools on the wrong side/not paying attention to instructions and then using the tool incorrectly.

6. Produce a short list of “Safety Rules” that we could display in the workshop to remind us of safe working habits.  

*Always have a tight grip

*Hands on handle not blade

*Listen to instructions

*hold in fist position

*Have fun while being safe :)


7. Design a “Safety Poster” that could be displayed in the workshop.

*https://docs.google.com/drawings/d/16-nX51D17NUfP5cbQjqHRUl_c0Ba5jga7gn7kwTWRRI/edit


Thursday, 2 September 2021

Hard Materials - Housing Joint

Intermediates Hard Materials Technology.

“Working from Home”


1.  Make a copy of this document and name it “Your Name” (eg.  Charles Bronson)  Share it with “grundy@tamaki.ac.nz”.   


2.  Watch the Woodwork “How to Video” and answer the following five questions:


a) What is the joint that we will use to join two pieces of wood together called?

Answer: Housing Joint


b) Name the three tools that we use to mark out where we will make cuts in the wood.


  1. Ruler


  1. Square


  1. Pencil


c) When we draw a line “square” to the edge, what angle does it make withe the edge?

Answer    90  degrees


d) What is a marking gauge used for?

Answer: Mark lines which indicates where to cut

e) If your joint is too tight to put together, how do you fix that?

Answer: Sand the edges down


I also made one of my own! My dad helped me and we finished it in about an hour. I got some of the measurements off, but it was fun to try.